So, to start off with, we need a chord progression to play over that changes keys. For arguments sake let’s say the progression is A7, D9, C9, G7. Remember, we want to treat this chord change as 4 separate keys, not all part of the same key of A and just play the Amin blues scale on top of it (which could work as well, but that’s not the topic of this tutorial). I will also play a simple improvisational example over each of the changes, staying strictly within the minor blues scale. A tip here is to sing along with your playing, to help your ear grow accustomed to the changes, but also to force your fingers to play more melodically and not just scalar passages up and down (which no one finds very interesting for very long).
Next, we will choose a area of the neck within which you must stay. Choose an area spanning 6-7 frets, no more than that. I have chosen frets 4-9 for this tutorial.
So, the object is to stay within the confines of this area when the key changes, and superimposing the pentatonics on top of one another, being able to see any key and the corresponding box simultaneously.
Now, record yourself, or have your friend play 4 bars each of these chords round and round (more on the friend or deck of cards approach later on). Then let’s start improvising!
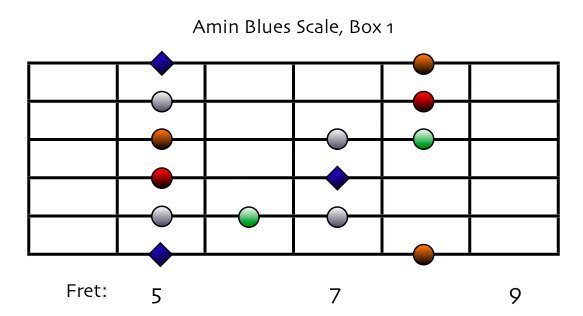
For the first 4 bars of A7, we will need to find the correct box in A within frets 4-9, and which one would that be? You guessed it, box 1, as depicted below.
An explanation of the colors here. I will use different colors to pinpoint different scale degrees throughout the following tutorials (much as I did in the Unlocking the Fretboard tutorial, only several other degrees, hence the different look of the fretboard diagrams this time. The color mapping is as follows:
*The Diamond-shaped dots represents the root, regardless of color.
*The Blue dots (when several colors are used) represents the root as well.
*The Green dots represents the b5 (“blue” note) added to the Minor Pentatonic that turns it into the Blues Scale.
*The Orange dots represents the third degree (minor thirds in this case).
*The Red dots represents the b7 degree (dominant seventh).
We won’t be using all of these in this tutorial, (only the root and b5) but we will in the following ”Note Targeting” tutorial, so familiarize yourself with the color mapping straight away, so you’re not too confused later on.
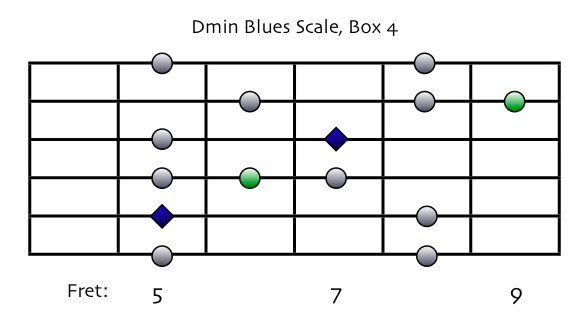
Then, when we come to the next chord in the progression, D7, what box must we utilize? Correct again, (darn you’re good!) the 4th box in D.
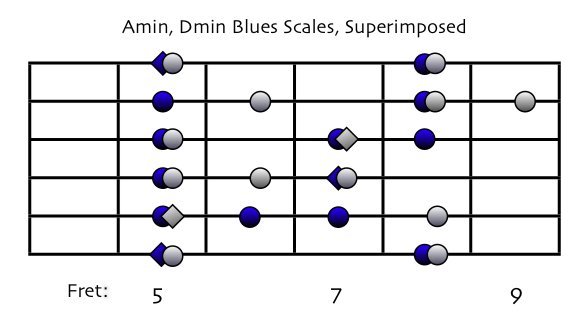
So, in the moment when the change is imminent (in bar 4), try to visualize that 4th box of D, while still playing in A. This is tricky at first, since it often throws you off in your playing to play in one key, whilst thinking of another. If in trouble, I recommend you go through my ”Timing and Note Value Alteration” tutorial, since timing is an invaluable life-saver in this situation! Also, if you’re going to be able to pull off my advanced tapping tutorials, where you need to be able to think not only in these two boxes when changing keys, but in 2-3 positions of each key, in two hands simultaneously all over the neck, you must have this down or you will crash and burn. So you see, even this simple exercise will pay off even in very advanced two-handed improvisation flowing all over the neck later on. This is what I mean by thinking conceptually about technique and theory, to be able to use the concept of the Pentatonic Finder exercise in ANY style or playing situation!
Here is what you should be visualizing when the change comes, the first box of A, superimposed by the 4th box of D. I have omitted the color mapping here for obvious reasons. Look at what notes the two scales have in common and chose a note to target for the change. Initially, the root is a good place to start, since that will really make your key change obvious. Later on, in the ”Note Targeting” tutorial, we will look at other target notes to use, and after that also tension notes.
Let's turn the page again!